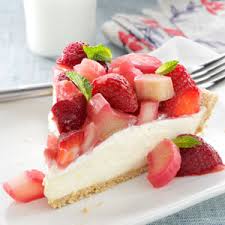
Rhubarb Berry Cheesecake Pie
Recipe provided courtesy of Taste of Home magazine. Find more great recipes at
As soon as strawberries and rhubarb come into season, I pull out this recipe so I’m ready to make it when the fruit is at its peak. The combination of flavors and textures simply can’t be beat. This cheesecake truly tastes like springtime!
LeeAnn McCue Charlotte, North Carolina
Rhubarb Berry Cheesecake Pie Recipe
Rhubarb Berry Cheesecake Pie
1 package (8 oz.) Philadelphia Cream Cheese, softened
1 can (14 oz.) sweetened condensed milk
6 Tbsp. lemon juice
1 tsp. lemon peel
1 tsp. vanilla
Dash salt
1 graham cracker crust (9 inches)
Topping: 2 cups sliced fresh or frozen rhubarb
¼ cup plus 2 Tbsp. water, divided
1 ½ tsp. unflavored gelatin
½ cup sugar
2 tsp. lemon juice
1 pint fresh strawberries, hulled and halved lengthwise
In a large bowl, beat cream cheese and milk until smooth. Beat in the lemon juice, lemon peel, vanilla and salt. Pour into crust. Cover and refrigerate for 2 hours.
Meanwhile, in a large saucepan, bring rhubarb and ¼ cup water to a boil. Reduce heat; simmer, uncovered, for 10 minutes or until rhubarb is tender. Drain. In a small bowl, sprinkle gelatin over remaining water; let stand for 1 minute. Stir gelatin and sugar into rhubarb. Bring to a boil.
Remove from the heat; stir in lemon juice. Cover and refrigerate until slightly thickened. Stir in strawberries. Spoon over pie. Refrigerate for 2-3 hours or until set. 6-8 servings
(Recipe for Rhubarb Berry Cheesecake Pie was in tasteofhome.com)


Recent Comments