Strawberry and Rhubarb Hand Pies

Strawberry Rhubarb Hand Pies

Strawberry Rhubarb Hand Pies

This recipe, Strawberry Rhubarb Hand Pies, before the strawberries are gone from the supermarket, try making these hand pies.


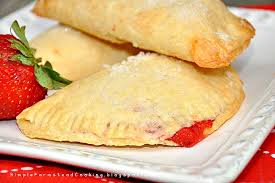
Strawberry and Rhubarb Hand Pies Recipe


Strawberry and Rhubarb Hand Pies

¾ cup finely chopped fresh strawberries

¾ cup finely chopped fresh rhubarb

½ cup Splenda or sweetener of your choice

1 Tbsp. tapioca, quick cooking

1 ½ tsp. grated orange peel

2 pie crust, refrigerated

1 egg yolk

1 Tbsp. whipping cream

2 tsp. sugar


Heat oven to 375 F.  Line large cookie sheet with parchment paper.  In 2 quart saucepan, mix strawberries, rhubarb, ½ cup sugar, the cornstarch and orange peel.  Cook over medium heat 6 to 8 minutes, stirring constantly, until bubbly and thickened.  Cool slightly.

Remove pie crusts from pouches; unroll on work surface.  With 2 ½ inch round cookie cutter, 14 rounds from each crust; reroll scraps.  On cookie sheet, place half of the dough rounds 2 inches apart.  Top each with 2 teaspoons fruit mixture.  Brush crust edges with water; top with the remaining dough rounds.  Press edges firmly with fork to seal.  Cut slits in top of each round.

In small bowl, beat egg yolk and whipping cream; brush over tops of pies.  Sprinkle with 2 teaspoons sugar.

Bake 20 to 25 minutes or until lightly browned.  Serve warm or cool.


(Recipe for Strawberry Rhubarb Hand Pies, Diabetic Connect, 2015)

PrintFriendlyShare

Sugar-Free Chocolate Cream Puffs

Sugar-Free Chocolate Cream Puffs

Sugar-Free Chocolate Cream Puffs


This recipe, Sugar-Free Chocolate Cream Puffs is from Diabetic Connect.   Desserts and sweets can be a challenge when living with diabetes.   Why don’t you try these puffs?


Sugar-Free Chocolate Cream Puffs Recipe


Sugar-Free Chocolate Cream Puffs

Cream Puff Ingredients:

1 cup water

½ cup margarine or butter

1 cup flour

4 large eggs

Filling Ingredients:

1 cup heavy or whipping cream

1 Tbsp. unsweetened cocoa

1 package (4 servings) chocolate flavor sugar-free instant pudding and pie filling

1 ¼ cup 2% milk


Preheat oven to 400 F.

To prepare cream puffs, heat water and margarine until margarine melts and mixture boils.  Remove saucepan from heat.  Add flour all at once.  With a wooden spoon, stir vigorously until mixture leaves side of pan and forms a ball.  Add eggs, ONE AT A TIME, beating well with wooden spoon after each addition until batter is a smooth and satiny.  Drop batter by tablespoonfuls onto greased cookie sheet, making 12 mounds.

Bake 30 to 40 minutes until golden brown.  Turn off oven.  Let puffs remain in oven 15 minutes.  Cool on wire rack.

While cooling, prepare filling.  In a small bowl, with mixer at medium speed, beat cream and unsweetened cocoa until stiff peaks form; set aside.  In a large bowl, prepare pudding as directed on package, using only 1 ¼ cups of milk.  Using a rubber spatula, gently fold whipped cream into chocolate pudding.

To assemble, carefully slice cream puffs in half.  Remove loose, uncooked batter.  Fill puffs with whipped cream, replace tops.  Refrigerate until served.


(Recipe for Sugar-Free Chocolate Cream Puffs came from Diabetic Connect, 2015)

PrintFriendlyShare

Ambrosia Pudding

Ambrosia Pudding

Ambrosia Pudding

Recipe provided courtesy of Taste of Home magazine.  Find more great recipes at www.tasteofhome.com


For a special way to round out a quick dinner, try this Ambrosia Pudding dessert.  Serving it in a parfait glass showcases to layers.

                Debbie Jones                                                                                     California, Maryland


Ambrosia Pudding Recipe

Ambrosia Pudding

2 cups cold 2% milk

1 package (3.4 oz.) instant vanilla pudding mix

¼ cup honey

2 tsp. grated orange peel

¼ tsp. vanilla

1 cup heavy whipping cream, whipped

1 banana, sliced

1 can (11 oz.) mandarin oranges, drained

¼ cup flaked coconut

¼ cup sliced almonds


In a large bowl, whisk milk and pudding mix for 2 minutes.  Let stand for 2 minutes or until soft-set.  Add the honey, orange peel and vanilla.  Fold in the whipping cream.

In individual dessert dishes, layer half of the pudding, banana slices, orange sections, coconut and almonds.  Repeat layers.  Chill.           4-6 servings

(Recipe for Ambrosia Pudding was on www.tasteofhome.com)

PrintFriendlyShare

Winter Mousse Pie

Winter Mousse Pie

Winter Mousse Pie

Before the winter is over…you can make Winter Mousse Pie with your left candy canes or peppermint candies.  With this pie you can use any color candy canes you like.

Winter Mousse Pie Recipe

Winter Mousse Pie

1 ½ cups crushed crème-filled chocolate sandwich cookies (15 -18 cookies)

¼ cup sugar

¼ cup margarine or butter, melted

Filling:   1 cup vanilla milk chips, or 6 oz. white baking bar, chopped

¼ cup milk

2 cups whipping cream

½ cup powdered sugar

1 tsp. vanilla

1/3 cup crushed candy canes (any color) or peppermint candies

Garnish:   2 to 3 Tbsp. crushed candy canes or peppermint candies

*    ATTENTION   *    ATTENTION    *

I’ve added  “SAVORY” meals, such as beef, chicken, pork and fish to Annette’s Sweet Treats.  Hope you like it.

Preheat oven to 375 F.  In small bowl, combine all crust ingredients; mix well.  Press in bottom of ungreased 8 or 9 inch pie pan.

Bake at 375 F. for 8 to 10 minutes or until set.  Cool completely.

In a small saucepan, combine vanilla milk  chips and milk.  Cook over low heat, stirring constantly with wire whisk, until melted and smooth.  Cool 30 minutes.  In large bowl, beat whipping cream, powdered sugar and vanilla until soft peaks form.  Gradually fold in cooled milk chips mixture and 1/3 cup crushed candy.  Spoon mixture into cooled crust.  Refrigerate at least 4 hours.

Just before serving, sprinkle with 2 to 3 tablespoons crushed candy.  Store in refrigerator.      8 servings

(Recipe for the Winter Mousse Pie was in  Pillsbury Classic Cookbooks, Real Home Baking, November 1994.)

Go onto my site:  annettes-sweet-treats.com, and leave a message – it’s at the top of each recipe on the right side…it will tell you to leave a comment.  I would like to know your thoughts of the recipe.

PrintFriendlyShare

English Toffee Crunch Cake Recipe

English Toffee Crunch Cake

This cake, English Toffee Crunch Cake, would be good with chocolate cake, if you can’t find the German Chocolate.  But if you’re like me, you wouldn’t make the cake until you found the right cake mix.  You should really try this cake…its gooood!

English Toffee Crunch Cake Recipe

English Toffee Crunch Cake

Cake:   1 pkg. Pillsbury Plus German Chocolate Cake Mix

1 ¼ cups water

1/3 cup oil

3 eggs

Frosting:   2 cups whipping cream

¼ tsp. instant coffee

3 Tbsp. firmly packed brown sugar

1 Tbsp. chocolate flavored liqueur, if desired

6 (1 1/8 oz.) English toffee candy bars


Heat oven to 350 F.  Grease and flour two 8 or 9 inch round cake pans.  In large bowl, combine all cake ingredients at low speed until moistened; beat 2 minutes at highest speed.  Pour into prepared pans.  Bake at 350 F. for 25 to 35 minutes or until toothpick inserted in center comes out clean.  Cool 15 minutes; remove from pans.  Cool completely.

In large bowl, beat whipping cream and instant coffee until slightly thickened.  Add brown sugar and continue beating until stiff peaks form.  Fold in liqueur.  Split each cake layer in half horizontally to form 4 layers.  Place 1 cake layer cut side up on serving plate.  Spread with ½ cup of frosting.  Crush one candy bar and sprinkle over frosting.  Top with a second cake layer cut side down; spread with another ½ cup of frosting.  Crush one candy bar and sprinkle over frosting.  Repeat with remaining layers.  Frost top and sides with remaining frosting.  Coarsely chop remaining candy bars and sprinkle on top and sides of cake.  Refrigerate until ready to serve.  Store in refrigerator.      12 servings

(Recipe for the English Toffee Crunch Cake recipe, Pillsbury Classic Cookbook, Chocolate Lovers III, Our Most Irresistible & Requested Recipes, 1988.)

Go onto my site:  annettes-sweet-treats.com, and leave a message – it’s at the top of each recipe on the right side…it will tell you to leave a comment.  I would like to know your thoughts of the recipe.

Hope you enjoyed the English Toffee Crunch Cake, if so, click “Like”.  I look forward to hearing from you, so let me know how you liked it!!

PrintFriendlyShare

Creamy Chocolate Lace Cheesecake Recipe

Creamy Chocolate Lace Cheesecake

I made this Creamy Chocolate Lace Cheesecake when I was living in Albany, New York.  I never had cheesecake that was made with whipped cream, but it was excellent, and made my dinner party complete.

Creamy Chocolate Lace Cheesecake Recipe

Creamy Chocolate Lace Cheesecake

Crust:   1 ½ cups chocolate wafer crumbs

½ finely chopped almonds

¼ cup margarine, melted

Filling:   2 (8 oz.) pkg. cream cheese, softened

2/3 cup sugar

3 eggs

2 cups semi-sweet chocolate chips, melted, cooled

1 cup whipping cream

2 Tbsp. margarine, melted

1 tsp. vanilla

Topping:   1 cup sour cream

1 ½ tsp. vanilla

1 tsp. sugar

½ oz. (1/2 square) unsweetened chocolate, melted

Heat oven to 325 F.  Butter 9 inch springform pan.  In large bowl, blend crust ingredients.  Press into bottom and up sides of prepared pan; refrigerate.  In large bowl, beat cream cheese and 2/3 cup sugar until smooth.  Add eggs, one at a time, beating well after each addition.  Add melted chocolate chips; beat well.  Add whipping cream, 2 tablespoons margarine and 1 teaspoon vanilla; beat until smooth.  Pour into prepared crust.  Bake at 325 F. for 55 to 65 minutes or until edges are set.  Center of cheesecake will be soft.  (To minimize cracking, place shallow pan half full of water on lower oven rack during baking.)  Cool in pan 5 minutes; carefully remove sides of pan.  Cool completely.

In small bowl, combine sour cream, 1 ½ teaspoons vanilla and 1 teaspoon sugar; stir until smooth.  Spread over cooled cheesecake.  Drizzle with ½ oz. melted chocolate in a lace pattern.  Refrigerate several hours or overnight before serving.  Garnish as desired.   16 servings

(Recipe for the Creamy Chocolate Lace Cheesecake recipe, Pillsbury Classic Cookbook, Chocolate Lovers III, Our Most Irresistible & Requested Recipes, 1988.)

Go onto my site:  annettes-sweet-treats.com, and leave a message – it’s at the top of each recipe on the right side…it will tell you to leave a comment.  I would like to know your thoughts of the recipe.

Hope you enjoyed the Creamy Chocolate Lace Cheesecake, if so, click “Like”.  I look forward to hearing from you, so let me know how you liked it!!

PrintFriendlyShare

Chocolate Orange Layer Pie Recipe

Chocolate Orange Layer Pie

I made this Chocolate Orange Layer Pie for dessert, and I must say that it was very good.  I always look for what I’ll make for dessert, and that will determine what I will make for dinner.  So when I made this pie, I made pork tenderloin, which wasn’t too heavy, and it had orange juice in the sauce, so it went well with each other.

Chocolate Orange Layer Pie Recipe

Chocolate Orange Layer Pie

1 package Pillsbury All Ready Pie Crust

Chocolate Filling:   ½ cup sugar

3 Tbsp. cornstarch

¼ tsp. salt

2 Tbsp. milk

2 oz. unsweetened chocolate

1 cup milk

2 egg yolks, slightly beaten

2 Tbsp. margarine

½ tsp. vanilla

Orange Filling:   1 tsp. unflavored gelatin

¼ cup frozen orange juice concentrate, thawed

1 cup whipping cream

¼ cup powdered sugar

Heat oven to 450 F.  Prepare pie crust according to package directions for unfilled one-crust pie using 9-inch pie pan.  (Refrigerate remaining crust for a later use.)  Bake at 450 F. for 9 to 11 minutes or until light golden brown.  Cool completely.

In small bowl, combine sugar, cornstarch and salt; mix well.  Stir in 2 tablespoons milk.   Set aside.  In medium heavy saucepan over low heat, melt unsweetened chocolate with 1 cup milk, stirring constantly until smooth.  Blend in cornstarch mixture.  Cook over low heat until mixture is thickened and boils, stirring constantly.  Boil 1 minute.  Blend about ¼ cup of hot mixture into egg yolks.  Gradually stir yolks mixture into hot mixture in saucepan.  Cook over low heat for 3 minutes, stirring constantly.  Remove from heat; stir in margarine and vanilla.  Cover surface with plastic wrap.  Refrigerate until just cool, about 1 hour.  Spoon chocolate filling evenly into cooled crust.

In small saucepan, combine gelatin and orange juice concentrate.  Stir over low heat until gelatin dissolves.  Cool slightly.  In small bowl, combine whipping cream and powdered sugar; beat until soft peaks form.  Fold orange juice mixture into whipped cream.  Spread evenly over chocolate filling.  Refrigerate 1 hour.  Store in refrigerator.              8 servings

Chocolate-Dipped Orange Sections:  For an easy-to-make garnish, drain mandarin orange sections.  In a small saucepan over low heat, melt ¼ cup semi-sweet chocolate chips and 1 tablespoon shortening.  Dip or spoon the chocolate mixture over half of each orange sections; place on waxed paper covered cookie sheet.  Refrigerate 15 to 20 minutes or until chocolate is set.

(Recipe for the Chocolate Orange Layer Pie recipe was in Pillsbury Classic Cookbooks, Bake-Off, Pies & Desserts, April 1993)

Go onto my site:  annettes-sweet-treats.com, and leave a message – it’s at the top of each recipe on the right side…it will tell you to leave a comment.  I would like to know your thoughts of the recipe.

Hope you enjoyed the Chocolate Orange Layer Pie, if so, click “Like”.  I look forward to hearing from you, so let me know how you liked it!!

PrintFriendlyShare

Raspberry Dessert Squares Recipe

I have made the Raspberry Dessert Squares 10 times or more when I was living in Albany, New York (1988). The only thing I would change now would be the chocolate wafer cookies.  Because in 2011, if you buy the wafer cookies they would cost $5.00, and you only get 15 or 20 cookies in a pack.  So I would buy the Little Teddy Bears cookies for $3.75, and you get a WHOLE box.

Raspberry Dessert Squares Recipe


Raspberry Dessert Squares

Crust:   8 ½ oz. pkg. chocolate cookie wafers, crushed, reserving 2 tsp. for garnish

½ cup margarine

Filling:   2 (10 oz.) pkg. frozen raspberries, drained, reserving liquid

2 Tbsp. cornstarch

2 cups powdered sugar

2 Tbsp. unsweetened cocoa

¾ cup margarine, softened

Topping:   1 ½ cups whipping cream, whipped, sweetened

Reserved 2 tsp. crushed chocolate cookie wafers

Butter 13×9 inch pan.  In a small bowl, combine wafers and melted margarine.  Press onto bottom of prepared pan.

In small saucepan, combine reserved raspberry liquid and cornstarch.  Bring to a boil over medium heat, stirring constantly until thickened; cool.  Once cooled, fold in raspberries.

In small bowl, beat powdered sugar, cocoa and ¾ cup margarine until light and fluffy.  Carefully spread mixture on crumb crust.  Refrigerate until firm.  Spoon raspberry mixture over butter layer.  Spread with sweetened whipped cream and sprinkle with reserved crushed cookies.  Store in the refrigerator.

16 servings

(Recipe for the Raspberry Dessert Squares was in Pillsbury Classic Cookbook; Chocolate Lovers III, Our Most Irresistible & Requested Recipes, 1988, page 52)

Go onto my site: annettes-sweet-treats.com, and leave a message – it’s at the top of each recipe; on the right side…it will tell you to leave a comment.  I would like to know your thoughts on the RECIPE.

Hope you enjoyed making the Raspberry Dessert Squares recipe, if so, click “Like”.   I look forward to hearing from you, so let me know how you liked it!!

PrintFriendlyShare

Choffee Chiffon Cake Recipe

Choffee Chiffin Cake

In 1988, I was living in Albany, NY.  I was looking through the Pillsbury 100 Prize Winning Bake-Off Recipes, and I decided to make the Choffee Chiffon Cake, which was the first time I had seen a chiffon cake with coffee in the cake.  I made the cake, and boy oh boy was it good.

Choffee Chiffon Cake Recipe

Choffee Chiffon Cake

7 eggs, separated

1 tsp. cream of tartar

½ tsp. salt

1 cup sugar

1 Tbsp. instant coffee granules or crystals

1/3 cup water

1 cup flour

2 oz. (2 squares) semi-sweet chocolate, grated

2 tsp. vanilla

Frosting:   2 cups whipping cream

2 oz. (2 squares) semi-sweet chocolate, grated

1/3 cup powdered sugar

1 ½ tsp. instant coffee granules or crystals

1 tsp. vanilla

Preheat oven to 325F.  In large bowl, beat egg whites, cream of tartar and salt until mixture forms soft peaks.  Gradually add ½ cup of sugar, beating until stiff peaks form.  In small bowl, beat egg yolks until thick and lemon colored.  Gradually add remaining ½ cup sugar, beating until thick.  Dissolve 1 Tbsp. instant coffee in 1/3 cup water.

Blend coffee mixture, flour, 2 oz. grated chocolate and 2 tsp. vanilla into egg yolk mixture.  Beat 1 minute at low speed or just until blended.  Gently fold egg yolk mixture into egg whites.  Pour into ungreased 10-inch tube pan.

Beat at 325F. for 50 to 60 minutes or until top springs back when touched lightly in center.  Invert cake on funnel or bottle; cool completely.  Remove from pan.  In large bowl, beat whipping cream until slightly thickened.  Reserve 1Tbsp. grated chocolate for top.  Add remaining grated chocolate, powdered sugar, 1 ½ tsp. instant coffee and 1 tsp. vanilla to cream; beat until firm peaks form (do not overbeat).  Slice cake in half horizontally to form 2 layers.  Fill and frost cake.  Sprinkle reserved 1 Tbsp. grated chocolate over top.  Store in refrigerator.  20 servings

HIGH ALTITUDE – Above 3500 feet:  Increase flour to 1 cup plus 3 Tbsp.  Bake at 350F. for 45 to 55 minutes.

(Recipe for the Choffee Chiffon Cake was in the Pillsbury Classic Cookbook; 100 Prize Winning Bake-Off Recipes, 1987)

Go onto my site: annettes-sweet-treats.com, and leave a message – it’s at the end of each recipe.  I would like to know what you think of the recipes.

Hope you enjoyed making the Choffee Choffon Cake recipe, if so, click “Like”.   I look forward to hearing from you, so let me know how you liked it!!

PrintFriendlyShare